
AC Moore Stretcher Kit – Canvas Stretcher Frames & DIY Frame Assembly
Our canvas stretcher kit gives you everything needed to build professional gallery-wrap frames at home or in the studio. Each kit includes pre-cut kiln-dried pine stretcher bars machined with interlocking corners, wood keys for tension adjustment, and assembly hardware. The bars feature a raised lip design that keeps canvas away from the frame edge, preventing impressions and ensuring clean sides on wrapped artwork.

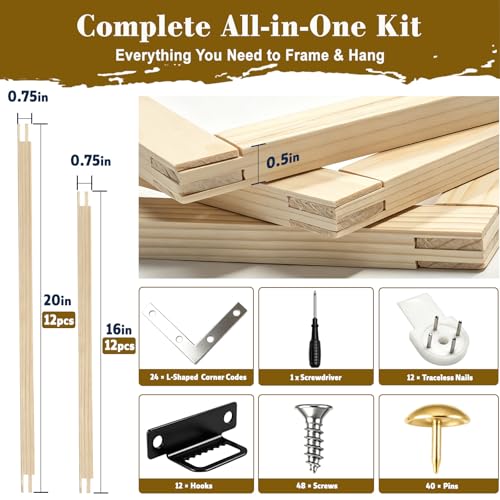


Each acmoore stretcher kit uses a tongue-and-groove corner joint that locks bars together without glue or nails during initial assembly. Slide the short bars into the long bars until corners seat flush, then tap gently with a rubber mallet to close any gaps. The kit’s eight wood keys—small triangular wedges—insert into slots on the inside corners after you’ve wrapped and stapled your canvas.
Choosing the Right Depth and Size
Standard Depth
Our 0.75-inch bars work for most home and studio projects where the frame will hang flush against a wall. This depth suits lightweight to medium-weight cotton duck canvases and keeps shipping costs manageable for larger sizes. Standard depth is the go-to for paintings under 24×36 inches.
Gallery Depth
The 1.5-inch option creates a modern gallery-wrap look where painted canvas wraps around deep sides, eliminating the need for a separate outer frame. Thicker bars also resist warping on canvases larger than 30×40 inches. If you plan to display unframed work or want contemporary depth, gallery bars deliver that professional exhibition feel.
Assembly Tips and Tools You’ll Need
Beyond the stretcher kit itself, gather a staple gun with 3/8-inch staples, canvas pliers for pulling fabric taut, and a tape measure. Lay bars on a flat surface to confirm square alignment before wrapping—check diagonal measurements, which should match if corners are true.
Start stapling at the center of each side and work outward toward corners, alternating sides to distribute tension evenly. Leave corners loose initially; fold and staple them last using hospital corners or pleated folds depending on your aesthetic. Once canvas is secured, insert keys by tapping lightly—over-driving them can split corner joints, so add tension in small increments and check fabric drum-tightness as you go.
What’s included in your kit
Complete Your Frame Setup


Customer reviews


Common Questions About AC Moore Stretcher Kits
Measure your finished artwork dimensions, then choose a kit that matches. Add 2–3 inches of canvas fabric on each side for wrapping and stapling—so a 16×20 stretcher needs canvas cut to at least 20×24 inches. If you’re buying pre-cut canvas, confirm it includes wrap allowance. Our kits range from 8×10 up to 48×60 inches in both standard and gallery depths.
Yes. Remove staples carefully with a flathead screwdriver or staple puller, pull out the keys, and disassemble the frame. Inspect bars for damage; if corners are intact, you can rebuild with fresh canvas. Many artists keep a rotation of stretcher frames and swap canvases seasonally or when experimenting with new work.
No glue is required for initial assembly—the tongue-and-groove corners lock mechanically. Once canvas is stretched and stapled, the fabric tension holds everything rigid. If a corner joint loosens over time, a small amount of wood glue on the joint will reinforce it, but most users never need adhesive.
Standard 0.75-inch bars sit flush on a wall and work for most small to medium canvases. Gallery depth bars at 1.5 inches create a deeper profile so you can wrap canvas around all sides and display the piece without an outer frame. Gallery depth also resists warping on larger stretched canvases over 30×40 inches.
Lay the assembled frame on a flat surface and measure diagonals from corner to corner. If both measurements match, the frame is square. Adjust by gently racking the frame until diagonals equalize, then secure by stapling canvas or tapping a few brads into the back joints before final canvas attachment.
Yes, though needlepoint fabric is stiffer than canvas and may require more frequent key adjustments. Use a staple gun with shorter staples to avoid piercing through to the front, and consider backing the finished piece with acid-free board for long-term stability if the textile is delicate.
Check canvas tension every 6–12 months, especially in climates with seasonal humidity swings. If you notice sag or wrinkles, tap keys in another eighth-inch on opposite corners. Over-tightening can stress joints, so add tension gradually and test fabric tautness with a light finger tap—it should sound like a drum.